플레이어 아바타 설정하기
TopDown으로 PlayerAvata를 설정하기 위해 카메라와 스프링암이 필요하다
#include "GameFramework/SpringArmComponent.h"

private:
UPROPERTY(VisibleAnywhere, BlueprintReadOnly, Category = "Camera", meta = (AllowPrivateAccess = "true"))
USpringArmComponent* _springArmComponent;

UPROPERTY(VisibleAnywhere, BlueprintReadOnly, Category = "Camera", meta = (AllowPrivateAccess = "true"))
UCameraComponent* _cameraComponent;
카메라와 스프링암을 얻을수 있는 getter함수를 만든다. FORCELINE은 언리얼 매크로이다
FORCEINLINE class UCameraComponent* GetCameraComponet() const { return _cameraComponent; }
FORCEINLINE class USpringArmComponent* GetSringArmComponet() const { return _springArmComponent; }
PlayerAvatar.cpp> 생성자에서 스프링암 변수들을 초기화 해준다.
// Create the camera spring arm
_springArmComponent = CreateDefaultSubobject<USpringArmComponent>(TEXT("SpringArm"));
_springArmComponent->SetupAttachment(RootComponent);		//Attach to the character root
_springArmComponent->SetUsingAbsoluteRotation(true);		//Don't rotate the arm with the character
_springArmComponent->TargetArmLength = 800.f;				//Set the arm's length
_springArmComponent->SetRelativeRotation(FRotator(-60.f, 0.f, 0.f));
															//Set the arm's rotation (60 degree up)
_springArmComponent->bDoCollisionTest = false;				//No collision test

// Create the camera
_cameraComponent = CreateDefaultSubobject<UCameraComponent>(TEXT("Camera"));
_cameraComponent->SetupAttachment(_springArmComponent, USpringArmComponent::SocketName);
															//Attach to the spring arm
_cameraComponent->bUsePawnControlRotation = false;			//Camera rotation is not controllable
생성자에서 Tick을 활성화하고 탑다운에서는 캐릭터가 달리는 방향만 정해지면 되므로, 플레이어가 캐릭터를 회전할 필요는 없다.
	PrimaryActorTick.bCanEverTick = true;

	// Don't rotate character to camera direction
	bUseControllerRotationPitch = false;
	bUseControllerRotationYaw = false;
	bUseControllerRotationRoll = false;
무브컴포넌트를 통해 캐릭터가 바라보고 달리는 방향이 제어된다. 회전 속도는 y축을 기준으로 640도 설정한다. 캐릭터는 바닥에 고정돼 있어야 한다.
// Configure character movement
auto characterMovement = GetCharacterMovement();
characterMovement->bOrientRotationToMovement = true; // Rotate character to moving direction
characterMovement->RotationRate = FRotator(0.f, 640.f, 0.f);
characterMovement->bConstrainToPlane = true;
characterMovement->bSnapToPlaneAtStart = true;
캐릭터 SksletalMeshComponent설정
Hero폴더를 만들고 우클릭해서 Hero.fbx를 임포트한다. 텍스쳐도 같이 임포트 한다.


matHero를 열고 텍스쳐와 Normal을 적용한다. 저장 Apply를 하면 반영된다.


_Anim이 붙은 애니메이션을 선택해서 Animation폴더를 만들어 끌어온다. Skeleton은 Hero_Skeleton로 설정하고 Import Animations를 체크한다.


BP_PlayerAvatar에서 Hero 스켈레탈메시 사용하기
PlayerAvatar 를 부모로 BP_PlayerAvatar 블루프린트를 만든다


스켈레탈메시를 Hero를 선택하고 앞을 바로보게 회전시켜준다.


게임의 플레이어폰 대체하기
기본게임모드로 PangeaGameMode를 설정하고 Default폰을 BP_PlayerAvatar로 변경하려면 PangeaGameMode C++클래스를 열어 다음 코드를 찾아 BP_TopdownCharacter를 BP_PlayerAvatar로 변경한다.
프로젝트의 폴더명도 포함시켜야 한다.
/Script/Engine.Blueprint'/Game/Hero/Blueprint/BP_PlayerAvatar.BP_PlayerAvatar'
APangeaGameMode::APangeaGameMode()
{
	// use our custom PlayerController class
	PlayerControllerClass = APangeaPlayerController::StaticClass();

	// set default pawn class to our Blueprinted character
	static ConstructorHelpers::FClassFinder<APawn> PlayerPawnBPClass(TEXT("/Game/TopDown/Blueprints/BP_TopDownCharacter"));
	if (PlayerPawnBPClass.Class != nullptr)
	{
		DefaultPawnClass = PlayerPawnBPClass.Class;
	}
컴파일후 플레이 해보면 이곳에서 에러가 난다 아직 AnimInstance()가 없어서 그렇다
auto animInst = Cast<UPlayerAvatarAnimInstance>(GetMesh()->GetAnimInstance());
animInst->Speed = GetCharacterMovement()->Velocity.Size2D();
애니메이션 블루프린트를 생성하자.
우선 Animinstance를 부모로 PlayerAvartarAniminstance클래스를 만들자


열거형을 만든다 상태를 나타낸다
UENUM(BlueprintType)
enum class EPlayerState : uint8
{
	Locomotion,
	Attack,
	Hit,
	Die
};
PlayerAvartarAniminstance.h에 Speed, State변수를 마련하고 Animation이 종료되었을때 State의 변경을 관리하는 OnStateAnimationEnds()함수를 추가한다.
UCLASS()
class PANGAEA_API UPlayerAvatarAnimInstance : public UAnimInstance
{
	GENERATED_BODY()


public :

	UPROPERTY(EditAnywhere, BlueprintReadWrite, Category = "Avatar Params")
	float Speed;

	UPROPERTY(EditAnywhere, BlueprintReadWrite, Category = "Avatar Params")
	EPlayerState State;

	UFUNCTION(BlueprintCallable)
	void OnStateAnimationEnds();

};
PlayerAvartarAniminstance.cpp
OnStateAnimationEnds()를 구현했다
// Fill out your copyright notice in the Description page of Project Settings.


#include "PlayerAvatarAnimInstance.h"
#include "PlayerAvatar.h"

void UPlayerAvatarAnimInstance::OnStateAnimationEnds()
{
	if (State == EPlayerState::Attack)
	{
		State = EPlayerState::Locomotion;
	}
	else
	{
		auto ownerActor = this->GetOwningActor();
		auto playerAvatar = Cast<APlayerAvatar>(ownerActor);

		if (playerAvatar == nullptr)
		{
			UE_LOG(LogAnimation, Error, TEXT("The owner actor is not a PlayerAvatar!"));
			return;
		}

		if (State == EPlayerState::Hit)
		{
			if (playerAvatar->GetHealthPoints() > 0.0f)
			{
				State = EPlayerState::Locomotion;
			}
			else
			{
				State = EPlayerState::Die;
			}

		}
		else if (State == EPlayerState::Die)
		{
			//...
		}
	}
}
Hero_Skeleton에서 AnimationBlueprint를 만들고 이름은 ABP_PlayerAvatar라고 한다.

Locomotion으로 들어가서 BlendSpace1D 노드를 추가하고 이름을 HeroBlendSpace1D로 변경한다

None위를 우클릭하고 Binding항목을 Speed로 변경한다.


Detail에서 MaxAxisValue를 500정도로 놓고 Animation을 끌어다 속도에 맞게 배치한다. speed 변수에 의해서 애니메이션이 블렌딩 된다.


Attack, Hit, Die State에 적당한 애니메이션을 연결한다.


Locomotion->Attack 트랜지션을 설정하자 변수에서 State를 끌어 Equal로 상태를 비교하고 연결하자


Attack과 Hit 에서 로코모션으로 돌아가는 노드도 추가한다.


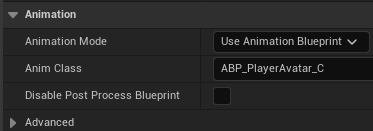
이제 BP_AvatarPlayer의 애니메이션 블루프린트를 연결해주면 프리뷰에서 아이들이 애니메이션된다.


PlayerAvatar.cpp Tick()에서 Mesh()에 연결되어 있는 AnimInstance()를 얻어와 PlayerAvatarAnimInstance로 캐스트해주고 변수인 Speed에 GetCharacterMovement()의 Velocity.Size2D()를 대입해준다.
말이 복잡한데 애니메이션 블루프린트의 BlendSpace1D의 바인딩된 Speed의값을 갱신해주기 위해서는 PlayerAvatarAnimInstance에 접근해야하는데 Mesh()에 연결된 AnimInstance를 얻어와 Casting해줘야한다.
// Called every frame
void APlayerAvatar::Tick(float DeltaTime)
{
	Super::Tick(DeltaTime);

	auto animInst = Cast<UPlayerAvatarAnimInstance>(GetMesh()->GetAnimInstance());
	animInst->Speed = GetCharacterMovement()->Velocity.Size2D();
}
이렇게 복잡하게 안하고 애니메이션 블루프린트에서 GetDefaultPawn에서 MovementComponent()의 Speed로 접근하는 방법도 있다. 이때는 speed를 블루프린트 로컬로 정의하고 사용한다. C++에서 처리하는게 빠를것 같다.

여기까지 했다면 플레이시 Hero가 보인다. 아직 인풋처리를 안했으니 움직이지는 않는다.

'언리얼러닝 > C++스크립트게임개발' 카테고리의 다른 글
| 7장 CanAttack() Attack() 함수 구현하기 (0) | 2025.05.27 |
|---|---|
| 07 PlayerController 캐릭터 제어하기 SimpleMoveToLocation (1) | 2025.05.24 |
| 언리얼 게임플레이 프레임워크 클래스 학습하기 (0) | 2025.05.16 |
| 게임프레임워크 링크 (0) | 2025.05.14 |
| MyShooter프로젝트 생성 - 기본 클래스 분석 (0) | 2025.04.29 |


